This is a step-by-step tutorial to show you how to make a sinamay pillbox hat fascinator using a wood hat block. This tutorial has a lot of photos that will guide you through this fun and easy millinery project.
Supplies
You will need the following supplies:
- Hat block
- Blocking stand
- Sinamay
- Petersham ribbon
- Thread
- Needle
- Comb
- Cling film
- Bowl with water
- Millinery wire
- Sticky tape
- Scissors x2
- Cutting pliers
- Ruler
- Measuring tape
- Blocking pins
- Thimble
- Dressmaker’s pins
- Dressmaker’s marker
- Iron
Optional:
- Apron
- Water-based millinery stiffener
- Brush

Here are a couple of notes about the supplies. You can purchase most of the supplies in regular grocery stores or shops that sell sewing supplies. As for the sinamay, millinery wire, stiffener, petersham ribbon and blocking pins we would suggest that you find a millinery shop. Mostly sinamay comes already stiffened, but you can purchase water-based millinery stiffener for straw and sinamay if you feel that you need more structure to the material (especially when blocking larger fascinators and hats). You can read more about blocking pins in our blog post – How to choose pins and thimble for hat blocking.
We would suggest that you use 2 different scissors – one pair of dressmaker’s scissors for cutting soft fabric, thread etc. and another pair for cutting rough millinery materials like sinamay or buckram.
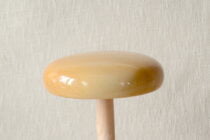
Hat block
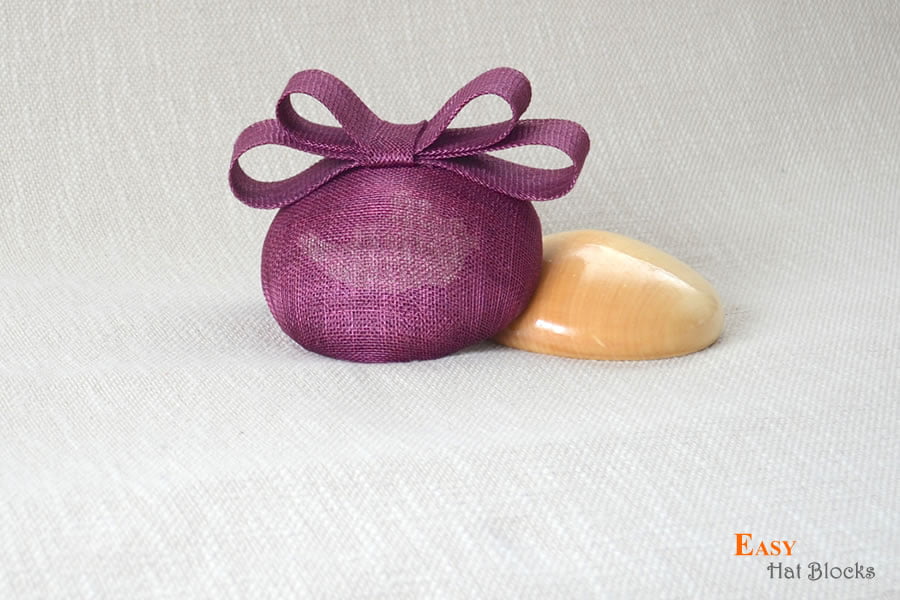
For this tutorial we have selected our hat block RUBY, but feel free to have a look at our other lovely pillbox hat blocks to find the perfect one for you. You may also consider using a hat block stand.


Sinamay

1. First thing to do is measure the hat block to see how large pieces of sinamay you will need.

2. For this hat block you will need 2-3 pieces of sinamay – 23 x 23cm (9×9”) large. Use 2 layers if you want a “lighter”, semi-transparent pillbox hat or 3 layers for a more sturdy and non-transparenthat base.

3. One of the sinamay pieces has to be cut on the bias. Use your first sinamay piece as a sample to cut another piece on the bias. You can use 2 rulers to get the right angle

4. You will also need a sinamay ribbon for trimming your hat. For the burgundy hat bow you will need a strip of 16x75cm ( 6 ¼” x 29 ½ “ ) sinamay cut on the bias. Feel free to cut a longer ribbon and then experiment with it creating your own unique trimming design. Remember – you can cut off the excess ribbon any time
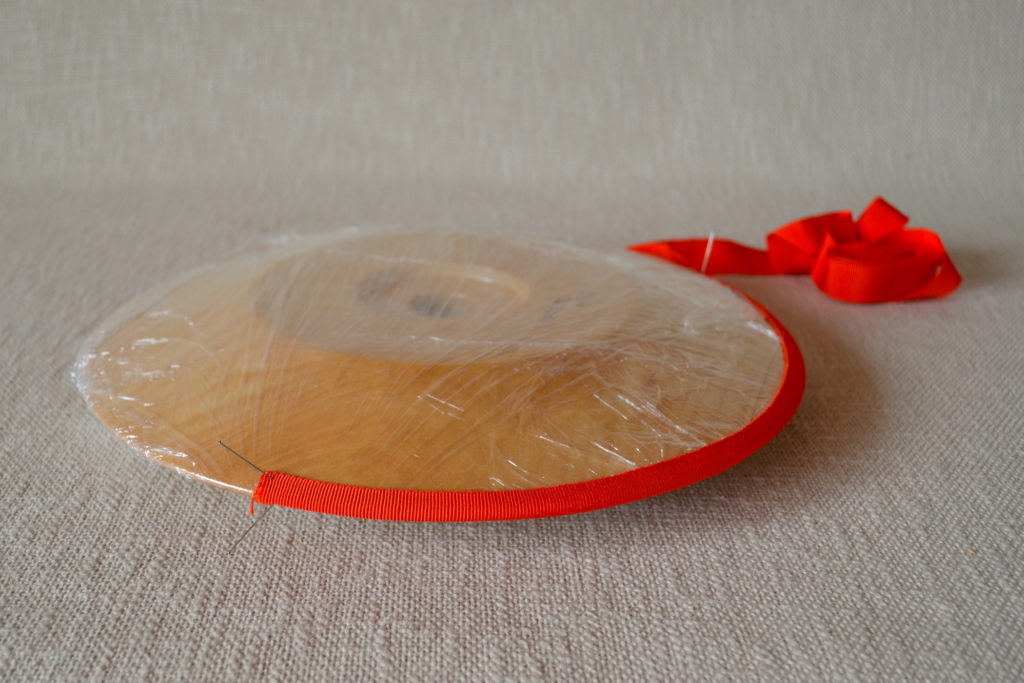
How to prepare a hat block for hat making

If you want to keep your hat blocks in perfect shape remember to cover them with cling film (or thin plastic bag) before blocking. Otherwise water and other substances that are used in hat blocking can soak into the wood and damage the hat block. Wrap at least 2 layers of cling film around the hat block. Read more about this in our blog post “How to take care of your hat blocks”.
How to block sinamay
There is some “magic” involved in turning this coarse and stiff material into beautiful round shapes. This magic is called water ?
Choose an appropriate working space where it is safe to work with water. Fill a bowl with room temperature water. Immerse the pieces of sinamay into the water for a couple of moments (not too long or the stiffener will wash out). The sinamay has to be damp, moist but not dripping. Make sure that every centimeter/ inch of the material is moist. Then lay all the sheets of sinamay on the table. Note – you may consider using a waterproof apron while blocking. If you want, you can add sinamay stiffener to the water, this will make the material even harder when it dries.


Start the blocking process – take one piece of sinamay and place it on the hat block. Each piece of the sinamay will have to be blocked separately to avoid creases. First pin the SIDES. Make sure to pull the material so that it tightly hugs the hat block. You only have to pin each side with one pin at the moment, e.g. 4 pins – one for each side. The pins will have to be removed and pined back as you keep adding the other layers of sinamay.
Use a thimble to protect your fingers while blocking!

Now place one palm on the hat block and use your other hand to pull down one corner of the material. You will notice how malleable the material has now become. Pin the 1st corner, it is OK to have creases on the reverse side ? just make sure that the top surface stays smooth. Now repeat the same for the opposite corner, then pin the other 2 corners.

See picture below how you roughly pin the material while adding all the layers of sinamay. Congratulations! You have mastered your very first step in blocking sinamay.

Now take the sheet of sinamay that was cut on the bias. Place it on top of the layer that is already blocked. Start with blocking the CORNERS. You can use the same pins as for the 1st layer to fix both layers. When the material of the 1st corner is arranged, carefully take out one pin and use it to pin both layers of sinamay. Do not pull out all the pins at once! This is a careful step-by-step process – first arrange the material on the surface, then pull out the pin, arrange both layers on the reverse side, pin both layers with the same pin. When blocking the sides of this bias sheet, remember to pull tightly so that no creases form on the surface of the hat.

Now pin the 3rd layer of sinamay following the steps as described for 1st layer. Once all the sides and corners have been roughly pinned, remove the hat block from the stand, turn it over and add some pins in-between, making sure that the material tightly hugs the hat block and no air-pockets form on the surface.

Good job! Now put the hat block back on the stand and leave it to dry. It can take from a couple of hours in hot, dry climate or 12-24h in more humid and cooler conditions. You can also place it in direct sunlight to speed-up the process. Just remember that sinamay is a natural material and may fade if is left in direct sunlight for too long.

How to remove the hat from the hat block
Make sure that all the layers of the material are completely dry. Remove the blocking pins. Next measure about 1.5-2cm (about 2/3“) from the edge of the hat and mark with the dressmaker’s pencil all around the hat. Cut off the excess.

This is how your hat looks from the reverse side. Carefully remove the sinamay hat base from the block. Try not to stretch the material too much or you can ruin the shape. This process can be tricky at first but you will learn it eventually… with time ?

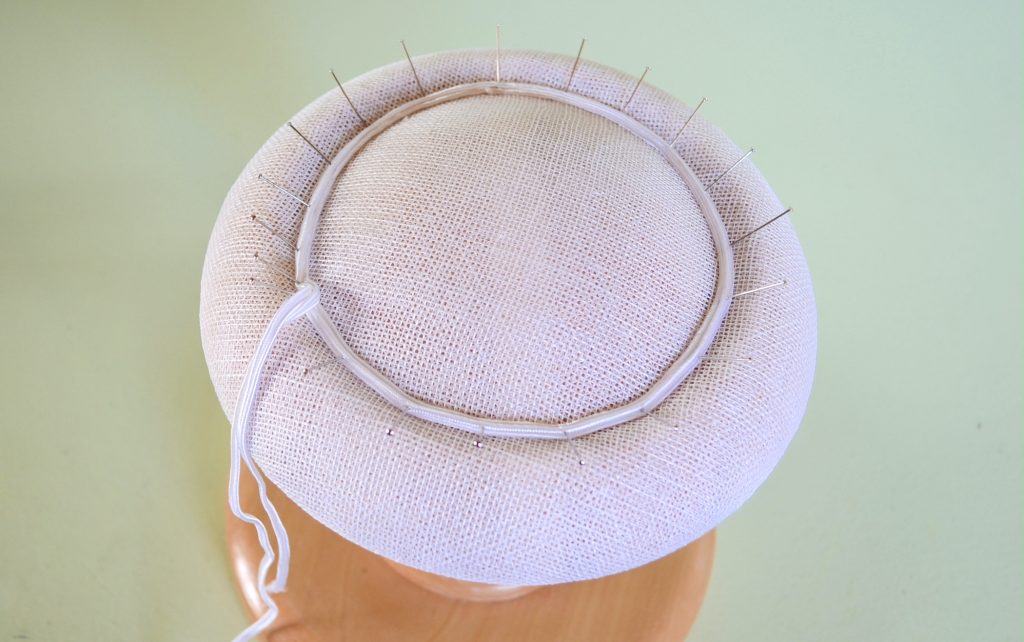
How to wire a hat using millinery wire
During the previous step you may have noticed that sinamay can easily loose it’s shape. To avoid this you have to strengthen the base of sinamay hats and fascinators with millinery wire.

You can use metal wire covered with rayon or plastic millinery wire. For this project I will use metal millinery wire.

To get the needed length of wire, measure it on the hat block and allow about 6-7cm (2 ½”) overlap. Cut it with millinery wire pliers. Do not use your scissors for cutting wire!!!

Fix the millinery wire together by wrapping sticky tape over the overlapping ends of the wire. Make sure the wire does not cross.

Now carefully insert the wire into the hat shape. Try not to bend the wire too much or distort the sinamay hat shape.
You will have to stitch the millinery wire to the hat base. I will use a sample with a bright thread to better show you the stitch (see picture below).

Use a thread matching the color of the sinamay. You will have to stitch all the way round the edge of the hat.

How to line hats or fascinators with petersham ribbon
Fascinators have to look neat not only on the outside but also on the inside ? Take petersham ribbon close to the color of the sinamay and pin it around the inside of the hat, leaving about 5mm (1/5 “) from the edge.

Allow about 5cm overlap, fold one end of the ribbon under. Hide both ends of the ribbon.

Now stitch the ribbon to the hat. Use a matching thread.

Well, doesn’t this look nice! Does your hat look similar? ?

How to trim a sinamay hat
The hardest is over! I promise! Now comes the most fun part – trimming!

Take the strip of sinamay ribbon that you cut previously and place it on an ironing board. Fold over about 1/3 of the ribbon (in this case about 5cm or 2”). At this stage use only your fingers to manipulate the material.

Then fold over the other side of the ribbon. And again use only your fingers to press the fold.
During the next step we will again create some “magic” ? Spray some (really very little) water on both sides of the bias bind. Let it soak in. Then hold down one end of the ribbon and pull it with the other hand. You will notice that the material will stretch and thus become more dense.
Repeat the holding-and-pulling all along the length of the ribbon. Just make sure that you do not pull too tight and that the ribbon is evenly wide. From a 16cm wide sinamay strip you should get about 3,5cm (1 1/5 “) wide sinamay bias ribbon. Iron the ribbon.


Now you can move on to experimenting with the ribbon to create some fabulous trimming for your hat. Or you can follow the steps below to create the elegant bow as in our burgundy pillbox hat ? For this bow you will need about 70-75cm (27 – 29”) long sinamay bias bind. Fold the ribbon in half and mark the center with a pin.
Then create 1 smaller and 1 bigger loop on each side. Once you have the desired size of the bow, pin the loops together so that the bow does not loose its shape.
You will also need a smaller sinamay bias ribbon to fold over the center of the bow. Once the bow looks nice enough, pin it to the hat.
Now comes one of the most important steps in this millinery project – try on the hat. Hold it to your head, look at it from every possible angle to make sure you like what you see. Make adjustments if needed. Stitch the bow to the hat.

Yippeee! You are almost finished! ? ? ?
Now comes the last but not least. This style of pillbox hats fixes well with plastic (or metal) combs. But you can also use a headband or hat elastic instead. Simply stitch the comb to the hat base at each end of the comb. You can use a smaller comb, just test if it will provide enough support.


TADAM! It is ready – your first hand-blocked pillbox hat!
Have fun wearing it!
Thanks a lot, this tutorial really helped me, I can’t wait to try it out.
We are glad you like it! Have fun hat making and send us some pictures with your creations! 🙂
Cannot wait to receive my second block from you , everyone wants this kind of fascinator now.
The hat block is the way to you! Send us some pictures with the lovely fascinators you make with it 🙂
Oh my goodness, this was the most comprehensive, easy to understand tutorial I’ve ever come across while looking for a how-to, and it has the best photos to follow along with! Thank you so much for creating this!
Thank you, Kendra! We are happy to hear that this millinery tutorial helped you.
Wonderful thank you so much for this lesson I gained a lot.
This is a wonderful tutorial.
Thank you, Angela! We are glad that you find it useful.
Thank you. Well explained. Will try out
Hİ, this was so helpful merci again but i wonder that only water and hat block can shape sinamay, should we use other chemicals with water,or after water process ?
Hi, mostly sinamay is sold already stiffened and if you create a small shape you will not need any additional stiffening. However larger design may require additional stiffening. You can purchase sinamay stiffener in stores that sell millinery supplies.
Thank you so much for this tutorial. I am a Red Hatter and I am so excited to make these for my chapter. You have made it straight forward and the step by step pictures are great. Thank you so much!!
Hi Cindy, happy to hear that our tutorial was useful. We would love to see pictures with the hats you make.
Hello,
I thought I must write and say how good your tutorial is and so simple to follow. The photographs are very good indeed, showing each step and how things should look. This is the first time I have blocked a hat and thoroughly enjoyed making it. I am very pleased with it indeed and have had some lovely comments from people.
Thank you.
Yvonne
Thank you, Yvonne! We are delighted to hear that you enjoyed the process! Hat making should be fun! 🙂
Thanks so much… This tutorial really helped.
Please can i have a tutorial on how to cover this same pillbox hat with a lace fabric. Thanks
Hello,
Thank you so much for this tutorial. I Love it. I find this very useful.
Maria
Oh I tried it. It turned out well and beautiful. Thanks for the tips it really helped.
Wow!!!! You made it as simple as ABC. Thank you so much
my sinamay is drying lighter than the original color, is this a dye problem? I’m doing the steps right but my beautiful teal is now a light blue. Any ideas?
Usually there are no problems with the dye, but maybe with the stiffener that has been used on the sinamay. Maybe next time do not immerse the sinamay fully into the water but rather spray the sheets with water slightly, let the water soak in and then shape the material. Good luck!
Thank you so much for the wonderful tutorial and beautiful pictures! So easy to understand!
I love it! I can’t wait to try it out!
hi am kindly asking for the quotations of the blocks,brims stands as soon as possible. theres a company that want to sponsor my business of hats and fascinators please. if you r selling sinamay material can i also a quotation of ii please.
Dear Thandi, there is something wrong with the e-mail address that you have provided. You can find all the details and prices for your hat blocks in the SHOP section of our web site: https://easyhatblocks.com/shop/ Currently we sell only our hand made hat blocks and no millinery materials like sinamay, veils etc.
I can’t thank you enough for this tutorial,more than helpful which to get more from you thank you so much.
Absolutely gorgeous! Very detailed and yet easy to follow steps! Thanks a lot.
Great tutorial with photos. Thank you very much.
Hi, it’s lovely to finally find a step by step guide on how to block a sinamay base?I cant wait to try it once Ive received my hat block. I’m trying to make a go of it starting my own business up in making bespoke fascinators which is doing well. To save money instead of buyingvpre maid sinamay pillowbox bases I want to make my own.
One question I have is the bought ones I buy the attached ribbon on the inside is done with a sewing machine, so how is this done without mishaping the base?
Fantastic tutorial. Well explanatory and easy to understand.thank you so much.
Thanks for the tutorial, it made it look so easy.
Well detailed. Thanks alot
Thank you so much for your generous tutorial. I want so much to try making a hat for a wedding but I don’t have a small hat block exactly like this ( nor ANY hat block!) so I guess I won’t! but I wish! You make it look very doable ! I’m in Ireland and I’d have to buy online, and blocks and postage are so expensive, especially as I’m probably not going to make more than one or two , to learn how.
Clare Brophy
Fantastic tutorial. I just love it. I keep coming back to it. Thanks so much.
Hi
Thank you very much for the well detailed step by step tutorial
This was indeed helpful
I can’t thank enough for the amazing lesson
You sharing with us.may you fly higher like and eagle with the blessing of God thank you !
Fantastic
Wow… Thank you so very much! This is the best tutorial I’ve ever received on sinamay hat making! Your work is perfect, I love this, and I’m going to try it out today. Thanks one again and more Grace to you.?
This very very comprehensive and i really liked the way you used pictures for the demonstration. Thanks very much
Yes, the lesson was great.
Thank you
This instruction is amazing. I have not made my hat as yet. I just saw the instruction this morning so I will have to find a store that sells the supplies that’s needed. Awesome
Wooow! What an amazing and simplified tutorials.I never believed i could learn this so fast.Your tutorials made it so easy for me.Thanks a million.